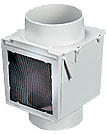
ENERGY
SAVING Dryer Vent Air Seal -
DRY21000 WINDOW WELL INSTALLATION:
For the Energy Saving Dryer Vent Closure™ to function properly,
it must be installed in a vertical position.
Remove the window pane
and replace with exterior grade plywood. Cut a 4" hole in the
plywood. A surface area of 14" in height is required to mount
the Energy Saving Dryer Vent Air Seal -
DRY21000
flush with the window. Mount the
Energy Saving Dryer Vent™ in a vertical position over the
existing hole. If there is not a 14" space, mount the top of the
canister to the siding of the house above the window, lining up
the elbow and the square flange (the flat portion of the elbow)
with the existing hole. Use exterior, high density styrofoam (6
˝" by 6 ˝" pieces) to fill the space between the square flange
and the window plywood. The number of pieces of styrofoam needed
will vary with the distance between the flange and window.
Be sure there are no
gaps between the flange and window. If multiple pieces of
styrofoam are used, secure the pieces to the square flange with
rubber bands. The bands can be cut and removed after the vent is
installed. Before inserting the styrofoam, be sure and cut a 4"
vent hole in all pieces. To secure the bottom flange to the
window plywood, insert wood screws through the flange and
styrofoam into the window plywood. The length of the screws
needed will be determined by the distance between the square
flange and plywood window.
SIDING INSTALLATION:
General Directions: The vent can be
adapted to many different types of siding. For the vent to
function properly, it must be installed in a vertical position.
In most instances, the vent will fit flush to the outside
wall. Simply remove the existing vent and cut the existing vent
pipe flush with the outside wall. The existing vent pipe must
not protrude into the vent.
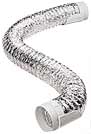
NOTE: The Energy
Saving Dryer Vent Air Seal -
DRY21000 does not include vent pipe ducting.
The 6 ˝" square flange on the vent mounts over the top of the
existing hole, allowing the air to flow from the existing duct
through the 4" elbow and out the bottom of the vent canister.
ALUMINUM SIDING:
For the Dryer Vent Air Seal -
DRY21000 to function properly, it must be installed in a
vertical position. Install according to "General Directions",
except use 1 ˝" wood screws. If it doesn't appear to be
airtight, you may have to caulk around the square flanges.
LAP SIDING:
For the Dryer Vent Air Seal -
DRY21000 to function properly, it must be installed in a
vertical position. Do not assemble the vent before mounting.
Mount the square flange on the elbow to the existing vent hole.
Place the canister in position on top of the elbow. With pen or
chalk, outline the rectangular canister flange on the siding at
the appropriate mounting placement. Cut out this portion of the
siding. This enables the vent to be mounted in a true vertical
position. Caulk with silicone around the canister flange to seal
out moisture.
BRICK, BLOCK OR
CONCRETE:
For the Dryer Vent Air Seal -
DRY21000 to function properly, it must be installed in a
vertical position. Mount with masonry screw anchors. Secure the
vent with appropriate screws. Silicone the edge of the square
flange to prevent leakage.
OTHER APPLICATIONS FOR
THE VENT: BATHROOM VENT:
When the bathroom is vented on the side of the house, follow the
appropriate instructions given for your type of siding or
building material. When venting through the roof, the elbow is
not used. The Dryer Vent Air Seal -
DRY21000 canister fits over the top of the existing 4"
(outside diameter) pipe. For proper venting, the canister must
rest at least 6" above the roofline. If the existing pipe is too
small, use a 4" (outside diameter) pipe reducer to adapt the
existing pipe to the proper size. Use plastic cement to adhere
the canister to plastic pipe. If the existing is not plastic, a
"friction fit" will keep the canister in place.
RANGE HOODS:
The Dryer Vent Air Seal -
DRY21000 is easily adaptable to any fan vent that has a duct
smaller than 6".
WARRANTY:
Warranty covers defects in the material
and manufacturing of this product for up to one (1) year from
date of original purchase. Any defective part will be replaced
without charge. The warranty does not cover damage to the
product caused by misuse, accidents or alterations.
|